How to Deal with Visible Artificial Grass Joints
Artificial grass joints become noticeable either due to seam tape releasing, edges lifting or opposite blade direction. How do you solve the problem? It’s pretty easy – simply unseam the joint, apply new tape, align edges and brush the grain lines to smooth out the connection. Learn how to seam artificial grass and the line becomes invisible.
Can you spot seams on artificial grass when they are done correctly? No chance! Is it possible to seam artificial grass by yourself? Definitely – two sections join and become one thanks to tape and glue. Well-done seam looks like a natural part of your lawn. A poor seam reveals artificial nature from the other end of your backyard. Further down, we’ll tell you about proper technique used by Site Prep crews to seam artificial turf and reason for joints becoming visible.
Table of Contents
Why artificial grass joints become visible
Before you can join artificial grass seams the right way, it helps to know why they came apart. A few usual suspects:
- The seam tape gave up – cheap adhesive, moisture, or just time loosens its grip.
- The edges were trimmed at slightly different angles, so they never sat flush.
- Grain mismatch. When blades lean in opposite directions, light catches them differently and the line jumps out.
- A lumpy base. Dips and bumps underneath telegraph straight through, which is why solid site preparation matters before any turf goes down.
- Missing infill along the joint, leaving the backing exposed.
And here’s the kicker – most visible artificial grass joints trace back to one of these, not to bad turf. Get the base right (a lot of that lives in our guide on how to install artificial turf) and you rarely notice them at all.
How to fix visible artificial grass joints step by step
Right – time to roll up those sleeves. Here is what you need to do to reconnect seams on artificial turf so they become invisible again. First you will need a utility knife, new seam tape, artificial turf glue, a stiff-bristled brush, and the item everybody needs to know about – the seam roller for artificial turf. This is essentially a weighted roller designed to press the turf into the glue evenly.
Step 1: Inspect the seam
Low and go with the line. What spot on the ceiling line is coming up? Has the tape peeled off, or is it loose? Inspect the area again under other lighting conditions; a crack that is barely visible during midday might be obvious later in the day. Use some golf tees to mark the work area.
Step 2: Remove infill from the joint area
Sweep the sand or rubber filling away from both sides of the joint a couple of hand-widths from the seam. Gather the debris into a pile instead of scattering it – you’re going to pour it right back onto the lawn again soon enough. You’ll need clean, dry backing fabric to work with.
Step 3: Lift the turf edges
Ease the turf edges off the backing along the existing joint carefully. If the turf is adhering strongly to the backing, you might want to use a putty knife to remove it. Take care not to rush when removing the edges – tearing the backing fabric will make your job much harder!
Step 4: Clean the seam area
Remove the old glue residue, sweep away any dust and debris, and weed any unwanted growths. Finally, ensure that everything is bone dry – no exceptions allowed. Glue simply will not adhere to a moist or dirty surface.
Step 5: Re-cut uneven edges if needed
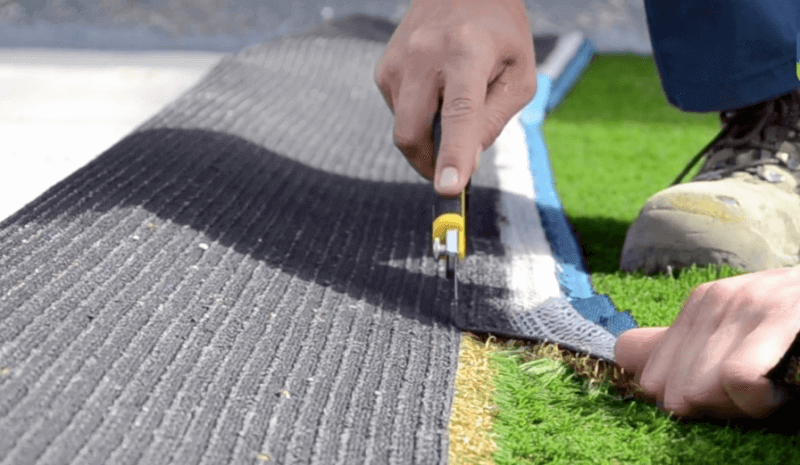
Trim any jagged edges to make them fit together properly. Remember always to trim from behind the turf, along the lines of stitches, roughly three blades back from the edge. Doing this prevents a bald line appearing on the seam and ensures a good fit. Be sure to use a sharp blade, changing it frequently, as anything else tends to shred rather than trim neatly. It’s done the same way with artificial turf around an edging – one smooth cut, then tuck it down.
Step 6: Place new seam tape
Lay new tape in the middle of the seam, with the shinny side of the tape pointing downward. Do you require seam tape for artificial turf installation? The answer is yes, because it serves as the base where the two artificial grass can come together and hold firmly. Make sure the tape is aligned to ensure evenness in the width of both sides of the grass.
Step 7: Apply artificial grass adhesive
Cover the tape with the glue in straight lines in a zigzag pattern using a notched trowel. Make sure to apply enough but do not overdo it since excess will ooze through the blades when dried resulting in ugly spots. Cover the artificial grass in portions before the glue skins over, particularly in the heat.
Step 8: Press the turf edges together
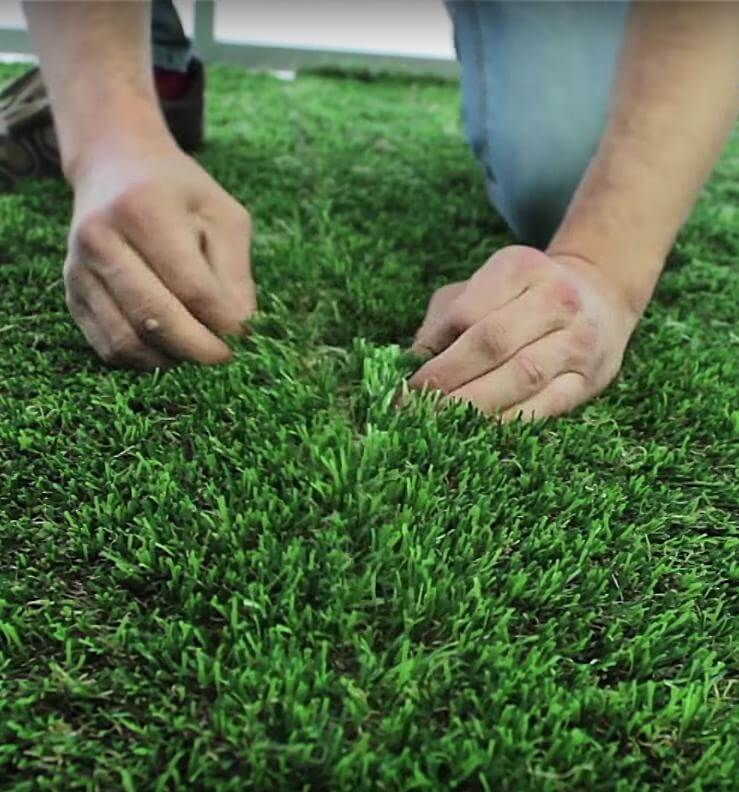
Fold both sides over to meet in the center, starting from one end without trapping any air in between and pressing up on the fibers as you go so that none are caught in the line. Here is where the real seam work on invisible seams takes place, and when doing invisible seams on artificial turf, this single action is the key. Run your hands along the seam lengthwise, and ensure the two pieces are even from eye level.
Step 9: Let the adhesive cure
Place weights over the entire seam, which could be wood planks, sandbags, or paving stones and then leave it be. The curing period should last for as long as indicated on the label, normally around one day. Avoid stepping or allowing animals to run across it until it cures fully.
Step 10: Brush the fibers and add infill
With a firm broom brushed against the grain, spread out the blades from both sides to get a seamless join that fits the texture of the rest of the lawn. The infill does its part – it lifts up the blade and covers the backing. Need it perfect after seaming? Check here for tips to clean artificial grass like the pros. Look from a distance at the seam… can you see it now?
And you’re done! Seam artificial grass properly once, and there’ll be no reason for panic whenever edges get raised – just a bit of preparation, some quality tape, and patience. Of course, some seams can be long or complicated and give you trouble. An experienced artificial grass seamer knows how to handle even those. (Taking everything into consideration? Check our article on the pros and cons of artificial grass vs. natural grass.) In the end, learning to seam artificial grass means getting rid of an obvious problem and turning it into something nobody will ever notice.